By signcraft
Posted on Wednesday, August 23rd, 2017
There’s something powerful about showing a customer the design you created for their vehicle on a photo of their vehicle. There’s no mystery about how the design will look on their truck—they see exactly how it will look. Brad Getter, Megagraphics, Rancho Cordova, California, uses this sales approach with great success on almost every vehicle graphics project. And he says it’s easy to do.
“I’ve found this technique to be a far more accurate way to get a starting layout than using vectorized vehicle templates,” Brad says. “And, your clients will be impressed by your proofs, with the layouts on their vehicle rather than on a stock image. It’s fast, too—it took less than 5 minutes in all to use it on this example.”
Brad designed a scaling target that he prints and applies to magnetic material. Then he applies the target to a relatively flat area on the vehicle and takes a photo. Back at the shop, he uses the target to precisely scale and position the graphics on the photo. The customer gets to see the photo of their vehicle with the new graphics on it.
“I carry these magnets in my car and have had my sales reps use them, too. I embed a legible copyright notice in the template so that the notice of my rights is in the original layout, unless I choose to block that later on.
“Once scaled,” Brad says, “you know the exact location of anything that might interfere with application and graphics. You also have the client’s vehicle in full size and color in your vector program. Body contours that are very curvy will affect these, but those are rare. You can position your graphics on the vehicle and use the image to sell the job.”
Brad explains how it works in the photos and captions that follow. Click here to download the PDF of the 10-by-10-in. scaling target that Brad designed for SignCraft readers. You can add your logo and a copyright notice to the target as you see fit.

Click the graphic on the left to download the printable target file at 10-by-10-in. then apply it to a sheet of magnetic material, or removable-adhesive vinyl.

Place the target on the vehicle body, taking care to align it to the center of the body area, and ideally near a vertical or horizontal line, such as a door seam. Step back about 20 feet and center the target in your camera’s viewfinder.
The marks on the target are designed to be easy to see both in the camera and on the screen. Ideally, enable the cross hairs or framing options of your camera to make alignment easier. Your goal is a straight-on shot that has the side of the vehicle in full view, with some background space surrounding it to avoid distortion.

Once you have the photo of the vehicle with the target on it, import the image into your design program. Over the image, draw a box from the exact upper left to the exact lower right corners of the target. If the target doesn’t align, rotate the image until it is as close to “true” in vertical and horizontal alignment as possible.

Now you can adjust the size. If the new box isn’t equal on all sides, you’ll need to adjust both vertical and horizontal sizes individually. Measure the box in the horizontal plane. Note the measurement of the width of the selection, which was 1.038 in this example. I’ve highlighted that in the photo above. Note the height as well. Divide the size of the original target, which was 10 inches, by this measurement. Do this for both the horizontal and vertical dimensions. Now scale the resulting adjustments to 100% by simply moving the decimal point two places to the right.
In our example, the width of our target is 1.038-in. in our design software. Divide 10 by 1.038 and you get 9.63391. Now move the decimal right to get 963.391. This is the percentage we must scale the horizontal dimension to get the actual size. Make a note of H963.391% for the horizontal scale percentage. Next, repeat this process with the vertical measurement and note the measurement as V969.932%. Adding an H and V to our notes help keep confusion at bay.
Select both the image and the box and scale both with those results. Verify the size change by checking the dimensions of the box. For design proofs, I clone the background color as a fill for the box if I want to “erase” the target.

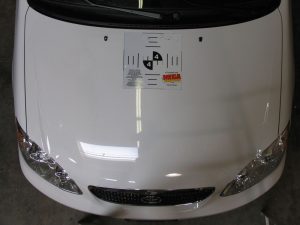
You can easily use the same approach to scale a photo of the hood, roof or back of a vehicle. For the hood or roof, shoot the photo from a ladder so that you can get the plane of the camera plane as true as possible to the surface. For this hood, I used Photoshop’s distortion tools (Lens Correction, etc.) to correct the distortion of the target that came from shooting at an odd angle. As long as your target can be brought square, you can get reliable results.
Click here for a printable version of the target